
Framer is a powerful prototyping tool that allows designers and developers to create interactive and responsive websites easily, without any coding knowledge needed.
With Framers intuitive drag-and-drop interface and robust features, you’re able to easily bring your design ideas to life, and have fun while doing it!
In this article, we will provide you with some top tips when using the Framer interface… Tips that we learnt and used while building our first template that we’ve released on the Framer website. These tips are to help you work more efficiently when using the Framer interface to build your website.
So let’s dive in and explore some of the best practices for using the Framer interface.
1) Learn some main keyboard shortcuts
Keyboard shortcuts are a combination of keys pressed at once that perform a specific action or function, without the need to use the mouse or touchpad. Learning keyboard shortcuts can significantly improve your productivity and efficiency, making your workflow faster and more streamlined, and we’ve created a list of the shortcuts we think you should learn to speed up your website building.
1) Open Quick Actions – ⌘ + k (Ctrl + k on PC)
With the quick actions section you can start typing and search for any elements you want to add to the page, create new pages or components, publish your changes and lots more.
2) Publish/Update website – ⌘ + ⇧ + P (Ctrl + Shift + P on PC)
3) Preview website – ⌘ + P (Ctrl + P on PC)
4) Zoom In & Out quicker on the canvas by using shortcuts
Zoom In – ⌘ & + (Ctrl & + on PC)
Zoom Out – ⌘ & – (Ctrl & – on PC)
5) Open Site Settings – ⌘ + , (Ctrl + , on PC)
Edit your website title & description, add page social images, view analytics and lots more within the Site Settings.
6) Copy & Paste sections and elements quickly
Copy – ⌘ + C (Ctrl + C on PC)
Paste – ⌘ + V (Ctrl + V on PC)
7) Copy section or element styles to duplicate the styling to other elements
Copy Styles – ⌘ + ⌥ + C (Ctrl + Alt + C on PC)
Paste Styles – ⌘ + ⌥ + V (Ctrl + Alt + V on PC)
8) Rename layers – ⌘ + R (Ctrl + R on PC)
If you’re interested in finding out all the shortcuts, you can navigate to the Framer icon in the top left corner and then go to Help -> Keyboard Shortcuts and you will then see the full list of keyboard shortcuts available.
2) Setup global styles
Global styles allow you to define the default styles for your project, such as font size, color palette, etc… By defining these styles at a global level, you can ensure that they are applied consistently throughout your project, reducing inconsistencies and design errors, and this also makes it easier to collaborate with other designers on the same project.
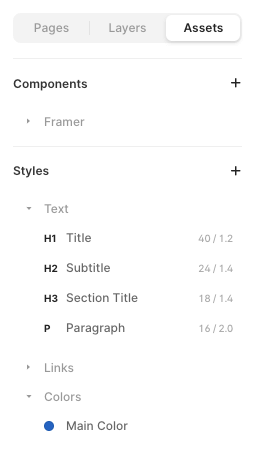
To add or edit your global styles you can navigate to Assets and find the Styles section, then click on the little plus section to choose which new global style to create.

Select to add a new Text, Link or Color style… Edit the relevant settings as you wantthe style to display, and make sure to name it appropriately so that you will easily recognize the style by name when selecting it within the Framer canvas interface.
You can also create new global Styles from within the user interface when adjusting the styling there.
3) Creating responsive containers & elements
Responsive design is essential in today’s mobile-first world, where an increasing number of people are accessing the internet using their smartphones and tablets.
By creating responsive containers and elements, you are providing an optimal viewing and interaction experience for your users viewing your website, regardless of the device they are visiting your site on.
How to create responsive containers:
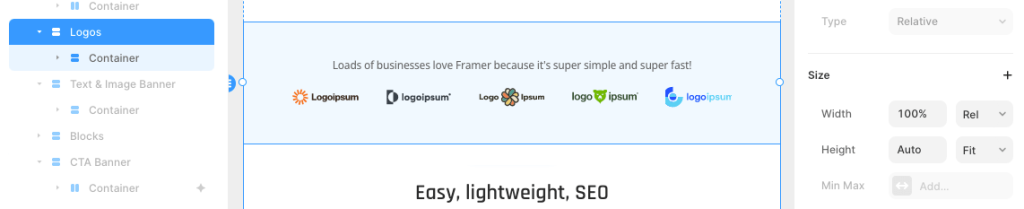
When creating the responsive layer sections for your site, see the layers panel on the images for the structure we’ve used.
This way you can add a color to the outer layer and it will span across to the left and right edges of the screen, no matter what size screen your visitors are viewing your website on, and on larger screens, the website content will remain at a max-width and sit centred on the screen too.
Note: DO NOT edit the actual canvas element to be set to a width of full or 100%, the canvas needs to be set at a width depending whether it’s Desktop, Tablet and/or Mobile.
First, create a new Stack element, which we will refer to as the “outer container” and set this elements width to “Relative” and “100%” width. The height is set to “Fit Content”.
If you want to add a background color or a background image, you can add it to this outer container element.
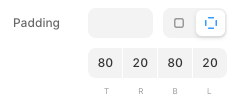
On the outer container element we also set the padding. Vertical padding is set at 80px (for content spacing) and horizontal padding is set at 20px (so the elements never touch the sides of the screen on smaller devices), and make sure the alignment is set to “Center”.

Next, you can add a new Stack element inside of the outer container, we’ll call this the “inner container” as this will hold all the content within.
See the image below where the outer container is shown with a dotted blue line and the inner container is the solid blue line… And set the inner container width to “Fill”, which means it will span the full width of the outer container. Also set the height to “Fit Content”.
And then add a “Max Width” to the inner container, enter the pixel amount and press enter.
We’ve set ours to 1160px but you can set this to any width you want your content to stay within on larger screen sizes.

And that’s it!
Reuse this structure for all your website elements unless you are wanting your design to stretch to full width on very large screens.
4) Use Copy & Paste shortcuts
As mentioned above, when reusing responsive layers or elements across your design, utilizing the copy and paste function proves to be a more efficient approach in creating new sections.
To begin, after creating a section that you intend to reuse or utilize as a starting point for a new section, we highly suggest copying and pasting the old sections to generate the new ones.
Copy – ⌘ + C (Ctrl + C on PC)
Paste – ⌘ + V (Ctrl + V on PC)
Moreover, copying and pasting can also be utilized across the different pages. For instance, when constructing a page header, we advise taking the time to fully complete it and include any essential animations before duplicating it across other pages by copying and pasting the sections or elements.
5) Naming your layers
Naming your layers in Framer is an essential part of creating organized and efficient projects, and can ultimately save you time and make your workflow smoother… It helps you stay organized and makes it easier to find specific layers within your project.
When you have many layers in your Framer project, naming them appropriately can help you quickly identify which layer is which, without having to inspect each one individually.
Also, if you’re collaborating with others on a Framer project, naming layers can help ensure consistency and prevent confusion. When you give layers descriptive names, it becomes easier for others to understand what each layer represents and how it fits into the overall design.
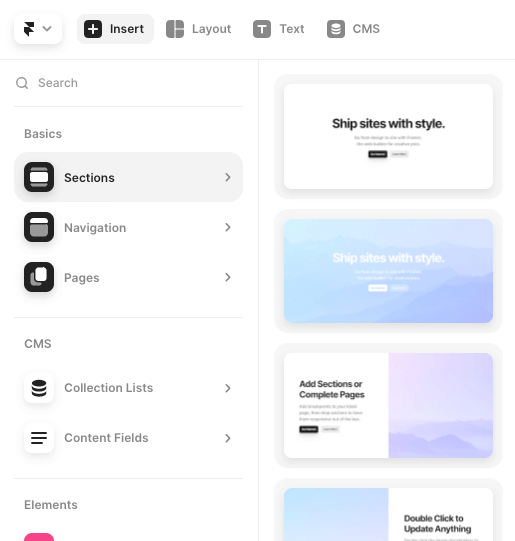
6) Use Sections as a starting point
Framer provides a wide range of Pages, Sections, Navigation elements, as well as various other design elements such as media, forms, icons, and lots more.
Leveraging these pre-built components as a starting point for website development can significantly accelerate the process.
After selecting the sections you want and making the necessary changes, we then recommend duplicating your customized pages and sections to further speed up the design process, as much of the groundwork is already in place.
These top tips when using the Framer interface should help to speed up your process of building a website with Framer. If there is anything that is not clear or you need help with then get in contact with us to help advise. We will add to the list if any other tips and tricks using the Framer interface come up.